Print a Web page
You can print a Web page from your Web browser on the HP Printer.
If you use Internet Explorer 6.0 or higher for Web browsing, you can use
HP Smart Web
Printing
to ensure simple, predictable web printing with control over what you want and
how you want it printed. You can access
HP Smart Web Printing
from the toolbar in
Internet Explorer. For more information about
HP Smart Web Printing
, see the help file
provided with it.
To print a Web page
1.
Make sure you have paper loaded in the input tray.
2.
On the
File
menu in your Web browser, click
.
TIP:
For best results, select
HP Smart Web Printing
on the
File
menu. A check
mark appears when it is selected.
The
dialog box appears.
3.
Make sure the product is the selected printer.
4.
If your Web browser supports it, select the items on the Web page that you want to
include in the printout.
For example, in Internet Explorer, click the
Options
tab to select options such as
As
laid out on screen
,
Only the selected frame
, and
Print all linked documents
.
5.
Click
or
OK
to print the Web page.
TIP:
To print Web pages correctly, you might need to set your print orientation to
Landscape
.
Related topics
•
Recommended papers for printing
•
Load media
•
View the print resolution
•
Create custom printing shortcuts
•
Set the default print settings
•
Stop the current job
Print using the maximum dpi
Use maximum dpi mode to print high-quality, sharp images.
To get the most benefit from maximum dpi mode, use it to print high-quality images such
as digital photographs. When you select the maximum dpi setting, the printer software
Print using the maximum dpi
15

displays the optimized dots per inch (dpi) that the HP Printer printer will print. Printing in
maximum dpi is supported on the following paper-types only:
•
HP Premium Plus Photo Paper
•
HP Premium Photo Paper
•
HP Advanced Photo Paper
•
Photo Hagaki
Printing in maximum dpi takes longer than printing with other settings and requires a large
amount of disk space.
To print in Maximum dpi mode
1.
Make sure you have paper loaded in the input tray.
2.
On the
File
menu in your software application, click
.
3.
Make sure the product is the selected printer.
4.
Click the button that opens the
Properties
dialog box.
Depending on your software application, this button might be called
Properties
,
Options
,
Printer Setup
,
Printer
, or
Preferences
.
5.
Click the
Advanced
tab.
6.
In the
Printer Features
area, select
Enabled
from the
Maximum dpi
drop-down list.
7.
Click the
Features
tab.
8.
In the
Paper Type
drop-down list, click
More
, and then select the appropriate paper
type.
9.
In the
Print Quality
drop-down list, click
Maximum dpi
.
NOTE:
To view the maximum dpi that the product will print, click
Resolution
.
10.
Select any other print settings that you want, and then click
OK
.
Related topics
View the print resolution
View the print resolution
The printer software displays the print resolution in dots per inch (dpi). The dpi varies
according to the paper type and print quality that you select in the printer software.
To view the print resolution
1.
Make sure you have paper loaded in the input tray.
2.
On the
File
menu in your software application, click
.
3.
Make sure the product is the selected printer.
4.
Click the button that opens the
Properties
dialog box.
Depending on your software application, this button might be called
Properties
,
Options
,
Printer Setup
,
Printer
, or
Preferences
.
5.
Click the
Features
tab.
6.
In the
Print Quality
drop-down list, select the appropriate print quality setting for your
project.
Chapter 2
16

7.
In the
Paper Type
drop-down list, select the type of paper that you have loaded.
8.
Click the
Resolution
button to view the print resolution dpi.
Create custom printing shortcuts
Use printing shortcuts to print with print settings that you use often. The printer software
has several specially designed printing shortcuts that are available in the Printing
Shortcuts list.
NOTE:
When you select a printing shortcut the appropriate printing options are
automatically displayed. You can leave them as is, change them, or create your own
shortcuts for commonly used tasks.
Use the Printing Shortcuts tab for the following print tasks:
•
General Everyday Printing
: Print documents quickly.
•
Photo Printing–Borderless
: Print to the top, bottom, and side edges of 10 x 15 cm
(4 x 6 inch) and 13 x 18 cm (5 x 7 inch) HP Photo Papers.
•
Paper-saving Printing
: Print two-sided documents with mutliple pages on same
sheet to reduce paper usage.
•
Photo Printing–With White Borders
: Print a photo with a white border around the
edges.
•
Fast/Economical Printing
: Produce draft-quality printouts quickly.
•
Presentation Printing
: Print high-quality documents, including letters and
transparencies.
To create a printing shortcut
1.
On the
File
menu in your software application, click
.
2.
Make sure the product is the selected printer.
3.
Click the button that opens the
Properties
dialog box.
Depending on your software application, this button might be called
Properties
,
Options
,
Printer Setup
,
Printer
, or
Preferences
.
4.
Click the
Printing Shortcuts
tab.
5.
In the
Printing Shortcuts
list, click a printing shortcut.
The print settings for the selected printing shortcut are displayed.
6.
Change the print settings to those you want in the new printing shortcut.
7.
Click
Save as
and type a name for the new printing shortcut, and then click
Save
.
The printing shortcut is added to the list.
To delete a printing shortcut
1.
On the
File
menu in your software application, click
.
2.
Make sure the product is the selected printer.
3.
Click the button that opens the
Properties
dialog box.
Depending on your software application, this button might be called
Properties
,
Options
,
Printer Setup
,
Printer
, or
Preferences
.
4.
Click the
Printing Shortcuts
tab.
Create custom printing shortcuts
17

5.
In the
Printing Shortcuts
list, click the printing shortcut that you want to delete.
6.
Click
Delete
.
The printing shortcut is removed from the list.
NOTE:
Only the shortcuts that you have created can be deleted. The original HP
shortcuts cannot be deleted.
Set the default print settings
If there are settings that you frequently use for printing, you might want to make them the
default print settings so they are already set when you open the
dialog box from
within your software application.
To change the default print settings
1.
In the HP Solution Center, click
Settings
, point to
Print Settings
, and then click
Printer Settings
.
2.
Make changes to the print settings, and click
OK
.
Chapter 2
18

3
Paper basics
You can load many different types and sizes of paper in the HP Printer, including letter
or A4 paper, photo paper, transparencies, and envelopes.
This section contains the following topics:
Load media
Recommended papers for printing
If you want the best print quality, HP recommends using HP papers that are specifically
designed for the type of project you are printing.
Depending on your country/region, some of these papers might not be available.
HP Advanced Photo Paper
This thick photo paper features an instant-dry finish for easy handling without smudging.
It resists water, smears, fingerprints, and humidity. Your prints have a look and feel
comparable to a store-processed photo. It is available in several sizes, including A4, 8.5
x 11 inch, 10 x 15 cm (4 x 6 inch) (with or without tabs), 13 x 18 cm (5 x 7 inch), and two
finishes - glossy or soft gloss (satin matte). It is acid-free for longer lasting documents.
HP Everyday Photo Paper
Print colorful, everyday snapshots at a low cost, using paper designed for casual photo
printing. This affordable, photo paper dries quickly for easy handling. Get sharp, crisp
images when you use this paper with any inkjet printer. It is available in semi-gloss finish
in several sizes, including A4, 8.5 x 11 inch, and 10 x 15 cm (4 x 6 inch) (with or without
tabs). For longer-lasting photos, it is acid-free.
HP Brochure Paper or HP Superior Inkjet Paper
These papers are glossy-coated or matte-coated on both sides for two-sided use. They
are the perfect choice for near-photographic reproductions and business graphics for
report covers, special presentations, brochures, mailers, and calendars.
HP Premium Presentation Paper or HP Professional Paper
These papers are heavy two-sided matte papers perfect for presentation, proposals,
reports, and newsletters. They are heavyweight for an impressive look and feel.
HP Bright White Inkjet Paper
HP Bright White Inkjet Paper delivers high-contrast colors and sharp text. It is opaque
enough for two-sided color usage with no show-through, which makes it ideal for
newsletters, reports, and flyers. It features ColorLok Technology for less smearing, bolder
blacks, and vivid colors.
HP Printing Paper
HP Printing Paper is a high-quality multifunction paper. It produces documents that look
and feel more substantial than documents printed on standard multipurpose or copy
Recommended papers for printing
19
Paper basics
paper. It features ColorLok Technology for less smearing, bolder blacks, and vivid colors.
It is acid-free for longer lasting documents.
HP Office Paper
HP Office Paper is a high-quality multifunction paper. It is suitable for copies, drafts,
memos, and other everyday documents. It features ColorLok Technology for less
smearing, bolder blacks, and vivid colors. It is acid-free for longer lasting documents.
HP Iron-On Transfers
HP Iron-on Transfers (for color fabrics or for light or white fabrics) are the ideal solution
for creating custom T-shirts from your digital photos.
HP Premium Inkjet Transparency Film
HP Premium Inkjet Transparency Film make your color presentations vivid and even more
impressive. This film is easy to use and handle and dries quickly without smudging.
HP Photo Value Pack
HP Photo Value Packs conveniently package original HP cartridges and HP Advanced
Photo Paper to save you time and take the guesswork out of printing affordable
professional photos with your HP Printer. Original HP inks and HP Advanced Photo
Paper have been designed to work together so your photos are long lasting and vivid,
print after print. Great for printing out an entire vacation’s worth of photos or multiple prints
to share.
ColorLok
HP recommends plain papers with the ColorLok logo for printing and copying of everyday
documents. All papers with the ColorLok logo are independently tested to meet high
standards of reliability and print quality, and produce documents with crisp, vivid color,
bolder blacks, and dry faster than ordinary plain papers. Look for papers with the ColorLok
logo in a variety of weights and sizes from major paper manufacturers.
NOTE:
At this time, some portions of the HP Web site are available in English only.
To order HP papers and other supplies, go to
www.hp.com/buy/supplies
. If prompted,
choose your country/region, follow the prompts to select your product, and then click one
of the shopping links on the page.
Chapter 3
20
Paper basics
P
a
per b
asics
Load media
▲
Select a paper size to continue.
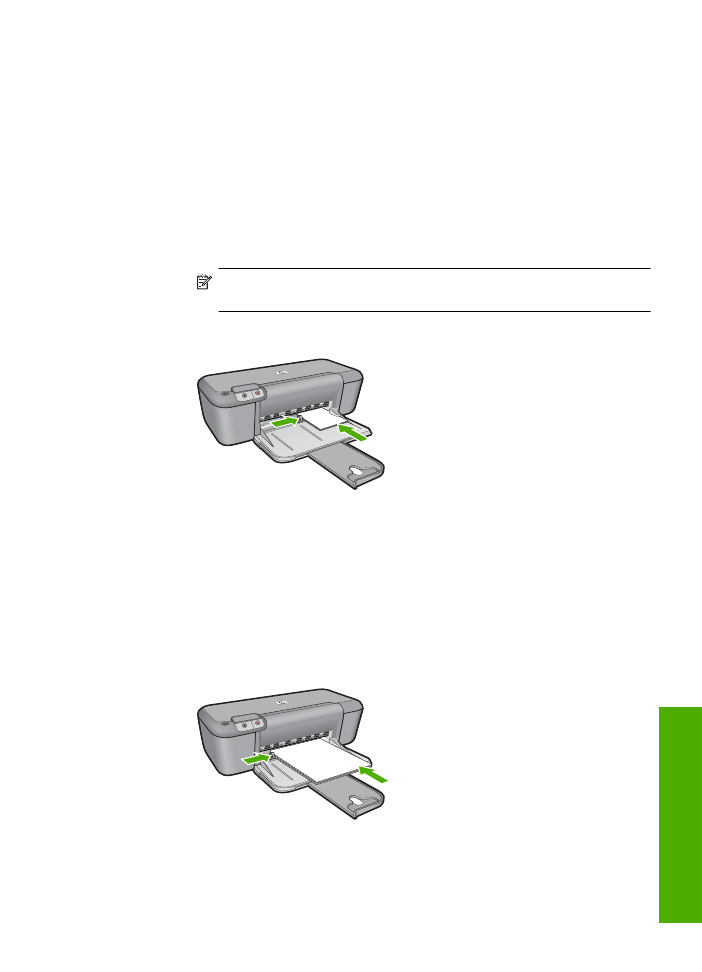
Load small-size paper
a
. Slide paper-width guide to the left.
❑
Slide paper-width guide to the left.
b
. Load paper.
❑
Insert stack of photo paper into photo tray with short edge forward and print
side down.
❑
Slide stack of paper forward until it stops.
NOTE:
If the photo paper you are using has perforated tabs, load photo
paper so that tabs are closest to you.
❑
Slide paper-width guide to the right until it stops at edge of paper.
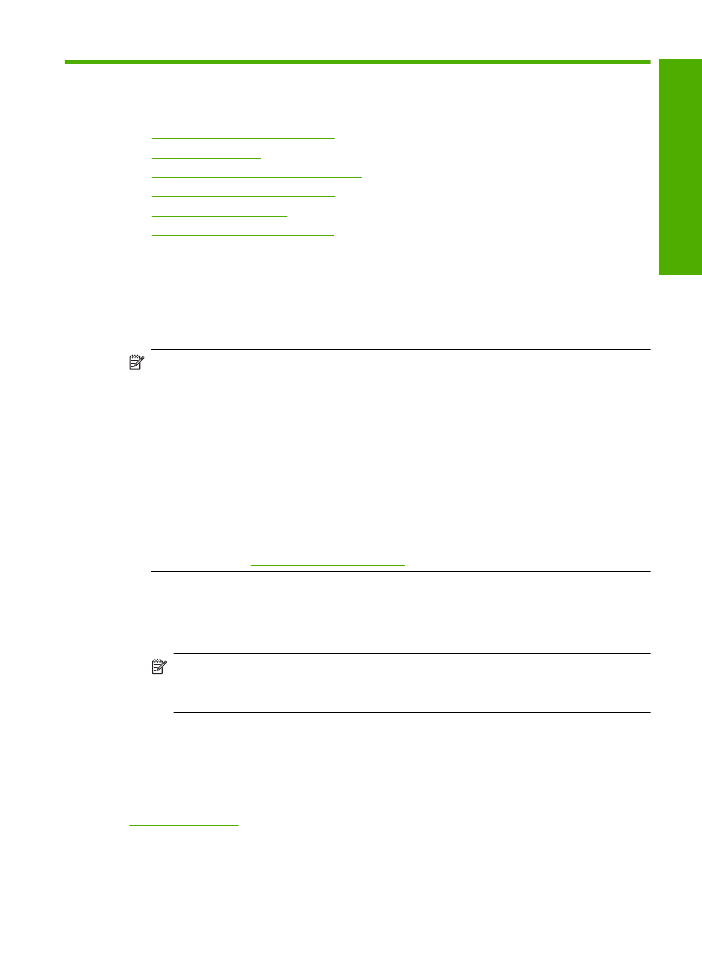
Load full-size paper
a
. Slide paper-width guide to the left.
❑
Slide paper-width guide to the left.
b
. Load paper.
❑
Insert stack of paper into input tray with short edge forward and print side
down.
❑
Slide stack of paper forward until it stops.
❑
Slide paper-width guide to the right until it stops at edge of paper.
Load media
21
Paper basics

Load envelopes
a
. Slide paper-width guide to the left.
❑
Slide paper-width guide to the left.
❑
Remove all paper from the main input tray.
b
. Load envelopes.
❑
Insert one or more envelopes into far-right side of the input tray, with envelope
flaps on left and facing up.
❑
Slide stack of envelopes forward until it stops.
❑
Slide paper-width guide to the right against stack of envelopes until it stops.
Chapter 3
22
Paper basics
P
a
per b
asics
4